Tensegrity Polyhedra
I've been making tensegrity polyhedra for about a decade now and have never taken the time to write about them for a general audience, so thought this might be a good time to do so. As with my post on modular origami with Sonobe units, we'll be looking at a single unit along with some mathematical insights that lead to a variety of structures.
Setup
In any tensegrity structure, there are two types of components: compression components and tension components. The compression components are things like rods or plates that are rigid. The tension components are things that are slack but can be made taut like ropes, wires, or cables. For our purposes, I'm going to recommend using dowels and rubber bands. A pair of these that work well together are craft mini dowels and rainbow loom style rubber bands, a pairing that was pioneered by Laura Taalman. Here are some options:
I used to specifically look for Loew-Cornell Woodsies mini dowels (or whatever they've been rebranded to), but they seem to be harder to get these days. The important thing is that dowels that are about 2.5" long play nicely with the lengths of the loom bands, so the two linked options would be fine.

A basic unit for our models will comprise two dowels and three rubber bands. It typically choose two of them to be one color and one to be another color, but you'll develop your own taste as you make these:

To form the unit, we start by attaching the two dowels to each other by winding a band around each end. I wind five times on each end, but four or six winds will also work. You want enough winds that they're drawn together tightly but not so many winds that they can't be separated at all. Leave a little of the dowels exposed at each end.

The exposed ends of the dowels will act as pincers, which is why it's important that you don't tie the dowels to each other too tightly. Thread your third rubber band through one of the pincers and then stretch it and thread it through the other pincer.

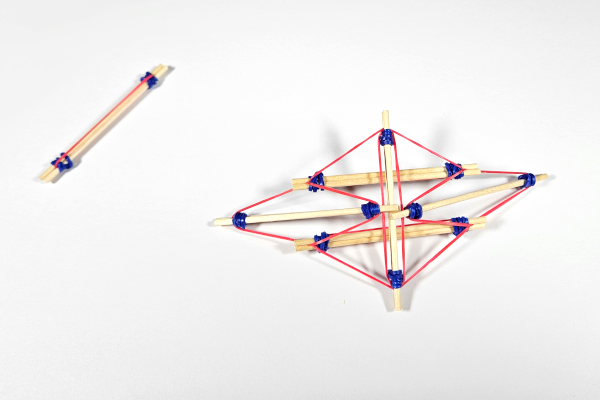
This will create a rod that has two segments of rubber band running tautly down its sides. Ideally the tautness will be the same in both segments. You can test this by grabbing each segment at its midpoint and pulling out to get a quadrilateral with the rod as one diagonal. Ideally it should form a rhombus as on the right and not a kite as on the left.
 |
 |
You can thread the band through one of the pincers toward the side of the kite with shorter sides to fix this.
A Few Structures
Octahedron ("Icosahedron")
For our first model, we'll build what many describe as an icosahedron. It doesn't matter what we name it, but for generalizing our construction scheme, I find it better to think of it as an octahedron.
To construct this, you'll first need to prepare \(6\) units:

Two units attach by pinching the pincers of one to the midpoint of a band segment of another. Attaching two should give you a T shape:

Attach a third unit to form an I shape:

Each of the units with a pinched band segment has an unpinched band segment on the other side. Take a fourth unit and run it parallel to the pincer unit, pinching both of these unpinched segments. This forms a thicker I:

Spreading the two stem pieces of the thick I apart, insert a fifth unit across them, pinching a band segment on each. This should hold the model open:

Take the two far parallel units and swing them in so that they can each pinch one of the band segments of that fifth unit:

Flip the model over and add a sixth unit parallel to the fifth unit, pinching the corresponding band segments on either side:

The arms that are swung to the back of the model can now be swung forward to pinch the band segments on the sixth unit:

If the model looks lopsided, then you can make minor adjustments by moving pincers along the band segments they are pinching, trying to get the pinch point closer to the midpoint of the segment. It's not necessary, but I find that it helps the model assume a more symmetric shape if I go back over each unit and add a second rubber band that runs around its length, reinforcing the first band:


Cuboctahedron
With the last model, we got the hang of how units connect, but with little sense for how the geometry might shake out. We'll build this next model a little more conscious of the polygonal faces of the resulting polyhedron as we form it.
First you'll first need to prepare \(12\) units:

The way these units make polygonal faces is by swirling around a polygon. For example, three can make a triangle or four can make a square:

In a cuboctahedron, every edge of a square is shared by a triangle and vice versa. You'll start this model by making a square from four units and then adding a unit to create a bordering triangle:

Add three more units, surrounding the square with triangles:

Lifting the "arms" of the triangles upwards will allow the structure to ball up:

Add four more units, creating four squares that share corners with the original square and edges with two triangles:

Pinch each new unit's pincer to the unpinched band segment of the new unit that it tilts toward, closing the structure:

After adjusting and reinforcing, the structure looks like this:


Icosidodecahedron
With the last model, we saw how we can target certain polygonal face arrangements, building one shape abutting the previous, eventually arriving at a polyhedron. This time we'll build a model more conscious of the global structure we'll end up with.
You'll need to prepare a healthy number of units for this model, but we'll determine the exact amount momentarily. First note that a vertex of the final structure is created by two units pinching a third:

This means that at this vertex, four polygons will meet at their corners. For this model, those shapes will be two pentagons separated by two triangles. Go ahead and build this:

We can see that a tensegrity unit forms two edges of the polyhedron we're building, separating a pair of polygons from another pair. Since the icosidodecahedron is the polyhedron where each vertex has the pentagon-triangle-pentagon-triangle pattern, we remark that since it has \(60\) edges, we will need a total of \(30\) tensegrity units.
Continue building out in layers, making sure each completed vertex satisfies the pentagon-triangle-pentagon-triangle pattern:


Once all units have been used, the final tricky step is figuring out how to close the shape off. If you've built out symmetrically (say five units at a time, maintaining five-fold rotational symmetry), it should hopefully be straightforward to see how the final pinches go:

Here is the final polyhedron after adjustments and reinforcements:


Classes of Structures
As we've seen, our construction method is well-suited for making polyhedra where all vertices have degree \(4\) -- i.e., four faces meet at each corner. We've been pinching at the midpoints of bands, suggesting the polygonal faces should be regular polygons, but this can be fudged. When we have a polyhedron in mind, the number of tensegrity units we'll need is half the number of edges of that polyhedron. This means that the number of dowels used will be the same as the number of edges and the number of bands will be double the number of edges, assuming you reinforce as I do.
Platonic Solids
The only Platonic solid with vertices of degree \(4\) is the octahedron. If we try to build a structure with every vertex surrounded by four triangles, we'll find that we're rebuilding the first structure we built. The angles force the band segments to open a little more than on the other structures we've made, however, making rhombi.
| Name | Edges | Polyhedron Model | Tensegrity Model |
| Octahedron (O) | \(12\) |  |  |
Archimedean Solids
The next natural structures to investigate are the Archimedean solids. We've built two so far, but there are two others that have degree-\(4\) vertices. (Excuse the fact that the polygons appear irregular in the renderings, but you can click the code next to the name to get to a version of the rendering you can rotate.)
| Name | Edges | Polyhedron Model | Tensegrity Model |
| Cuboctahedron (aC) | \(24\) |  |  |
| Icosidodecahedron (aD) | \(60\) |  |  |
| Rhombicuboctahedron (eC) | \(48\) |  |  |
| Rhombicosidodecahedron (eD) | \(120\) |  |  |
Antiprisms
For each regular polygon base, we can make an antiprism. The triangular antiprism is just the octahedron, which we've made. Below are the square and pentagonal antiprisms, but you can also construct bigger ones.
| Name | Edges | Polyhedron Model | Tensegrity Model |
| Square antiprism (A4) | \(16\) |  |  |
| Pentagonal antiprism (A5) | \(20\) |  |  |
Johnson Solids
Johnson solids do not have the same shapes at every vertex, so they are less regular and often harder to construct. Here's one possible construction, but there are plenty of others!
| Name | Edges | Polyhedron Model | Tensegrity Model | Elongated square bipyramid (J15) | \(20\) |  |  |
Other Polyhedra
Below is a hendecagon that doesn't fit into one of those nice buckets because six of its eleven faces are isosceles triangles. (The others are two equilateral triangles and three squares.) It has \(18\) edges.
 |  |
"Near-miss" Johnson solids have served as nice fodder for tensegrity models in the past. One of my favorites is the rectified truncated icosahedron (atI), which has a whopping \(180\) edges and turned out to be about the same size as my head:
 |  |
I can't recall if I've made it, but if that's not big enough, the expanded truncated icosahedron (etI) has \(360\) edges!

I've definitely made toroidal polyhedra and other oddities. If you play around with this construction method, I'd love to see what you come up with!
 |  |
Comments
Post a Comment